目录
1. 说明
2. 服务器
3. 安装
4. 配置实践
4.1 人员与项目
4.2 部署准备
4.2.1 访问变量及用户账号设置
4.2.2 Gitlab Runner的设置
4.2.3 要点
5. 容器镜像(Container Registry)
5.1 准备
5.2 配置
5.3 测试
6. 应用项目 CI/CD
7. Version 17.6 安装
8. 参考
1. 说明
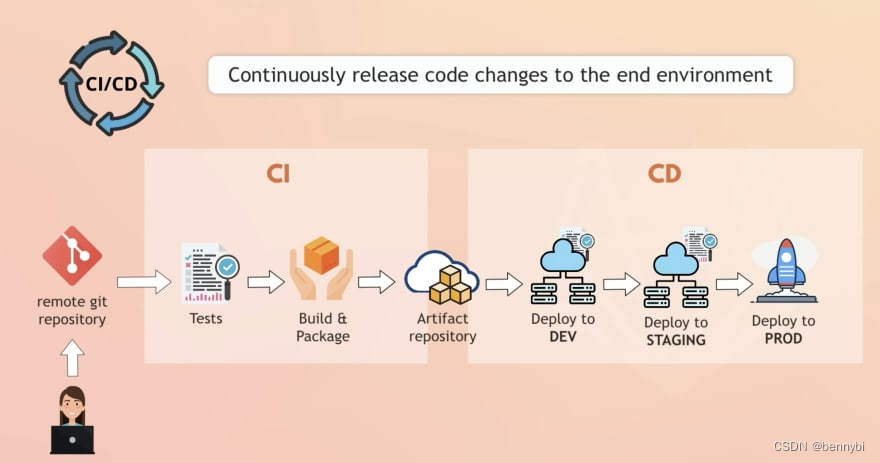
Gitlab是一个强大且免费的代码管理/部署工具,能统一集成代码仓库,CI/CD的工作。开始时我以为只能在官网上使用,后来才知道能私有化部署,确实了不起。
原理图:
2. 服务器
gitlab资源要求比较高,建议8核16G,目前我的虚拟机是分配了5核12G,要是工作负荷上来,还要划拨资源。
| Server | IP | 配置 | 备注 |
|---|
| host001.dev.ia | 192.168.0.130 | 5核/12G/200G硬盘 | Gitlab服务器 / Gitlab Runner工作站 / 开发服务器1 |
| host002.dev.ia | 192.168.0.131 | 2核/4G/200G硬盘 | 开发服务器2 |
在各自的 /etc/hosts 做上述设定
3. 安装
docker-composer方式,指定外部访问url为 http://host001.dev.ia:18181
本地网络环境的gitlab.yml
version: "3.5"

services:
  web:
    image: 'gitlab/gitlab-ce:latest'
    container_name: gitlab
    restart: always
    hostname: 'gitlab.dev.ia'
    environment:
      GITLAB_OMNIBUS_CONFIG: |
        external_url 'http://host001.dev.ia:18181'
        # Add any other gitlab.rb configuration here, each on its own line
    ports:
      - '18181:18181'
      - '2222:22'
      - '5050:5050'
    volumes:
      - '/data0/Server/Settings/gitlab:/etc/gitlab'
      - '/data0/Server/Logs/gitlab:/var/log/gitlab'
      - '/data0/Server/Db/gitlab:/var/opt/gitlab'
    shm_size: '256m'
在线服务器的gitlab.yml
services:
  web:
    image: 'gitlab/gitlab-ce:latest'
    container_name: gitlab
    restart: always
    ports:
      - '18181:80'
      - '2222:22'
      - '5050:5050'
    volumes:
      - '/data0/Server/Settings/gitlab:/etc/gitlab'
      - '/data0/Server/Logs/gitlab:/var/log/gitlab'
      - '/data0/Server/Db/gitlab:/var/opt/gitlab'
    shm_size: '512m'
安装后进去容器设置管理员(root)密码
gitlab-rails console -e production

irb> user = User.where(id: 1).first
irb> user.password = 'xxx'
irb> user.password_confirmation = 'xxx'
irb> user.save!
4. 配置实践
4.1 人员与项目
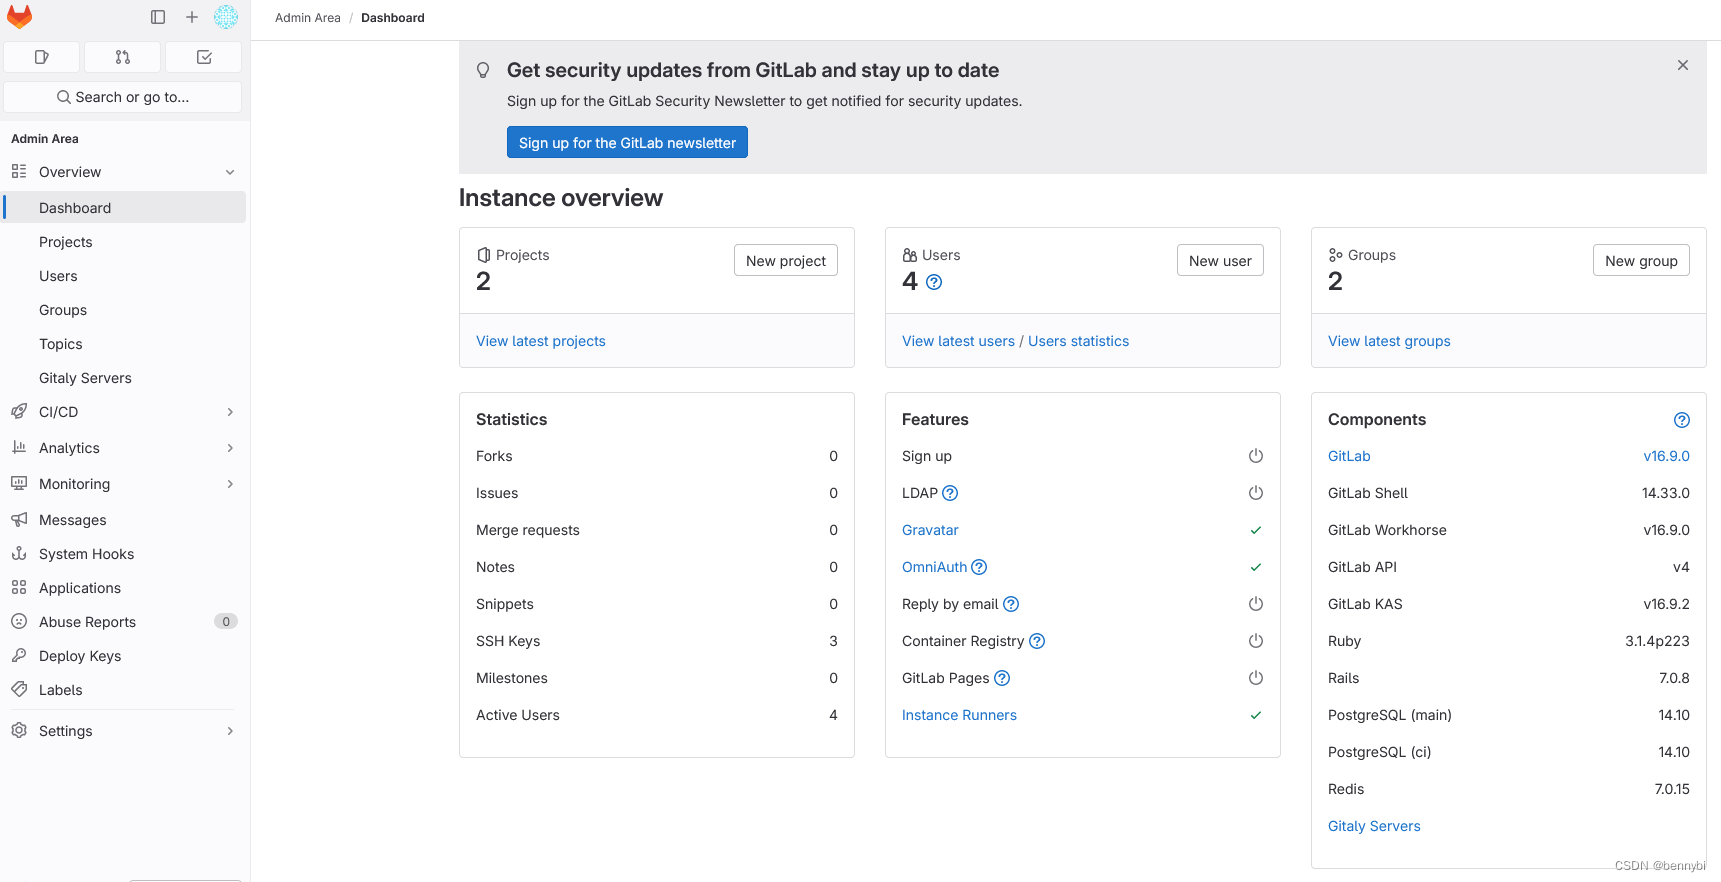
进入管理后台,建立两个开发组,3名用户成员 (Regular Member权限,配置ssh公钥),两个团队项目, 每个项目分别建 dev / staging / live 分支,检查 pull & push是否正常
| Group | Member | Project | Branch |
|---|
| Dev1 | root, ben, developer1 | Team1 Prj1 | dev / staging / live |
| Dev2 | root, ben, developer2 | Team2 Prj1 | dev / staging / live |
如图:
添加系统用户 sysuser1,用于镜像推送等内部操作
4.2 部署准备
4.2.1 访问变量及用户账号设置
- 在gitlab服务器,因为docker化安装的,需映射ssh访问端口 22 => 2222
- 用工具生成deployer密钥,然后用管理员账号登录gitlab后台:
-- 配置deployer私钥变量
Admin Area => Settings => CI/CD => Variables, 定义 SSH_PRIVATE_KEY,用deployer的私钥填充,将在.gitlab-ci.yml里使用。(注:去掉默认的Protect variable勾选,不然部署时会出现“Error loading key "(stdin)": error in libcrypto”问题)
-- 配置仓库访问公钥, 可选择添加:公共的部署公钥或项目部署公钥(2选1)
A 公共公钥:Admin Area => Deploy Keys,然后在项目Deploy keys中enable之
B 项目公钥:切换到项目 Settings => Repository => Deploy keys,添加deployer的Privately keys并且enable,使得deployer用户可访问代码仓库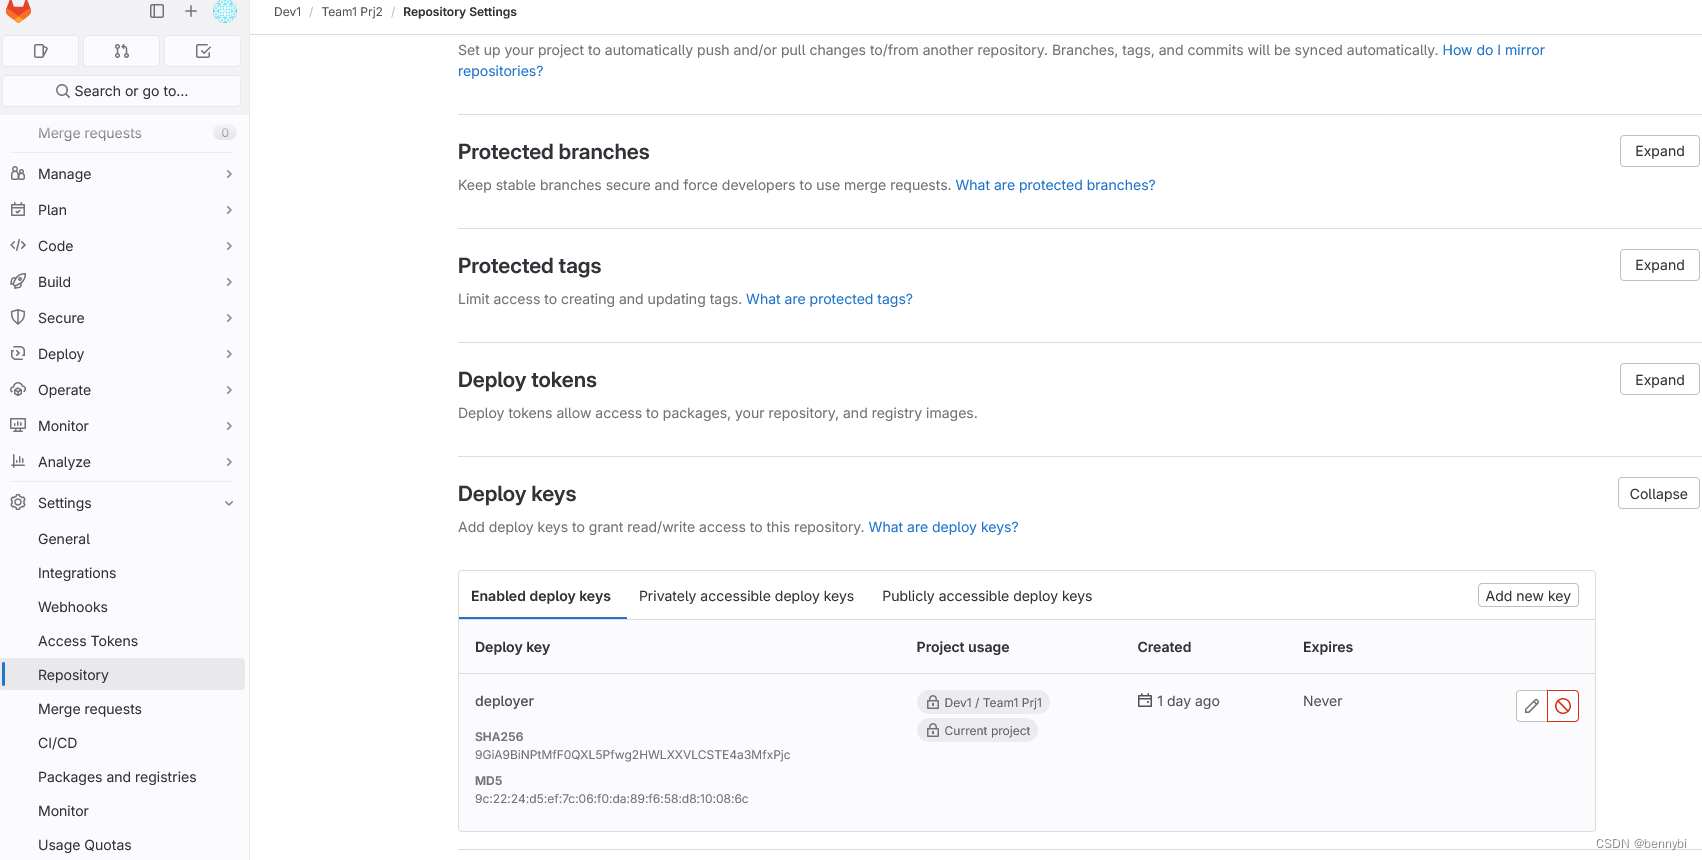
- 在部署服务器建deployer账号,分配密钥,目录访问权限,脚本:
adduser deployer
setfacl -R -m u:deployer:rwx /www/wwwroot

# 为解决安全及读写权限问题,把deployer设置为主组www,加入到docker组,www用户则加到deployer组
usermod -g www deployer
usermod -aG docker deployer
usermod -aG deployer www

# 建立密钥文件, 通过vi把该用户的密钥加上
mkdir -p /home/deployer/.ssh && touch /home/deployer/.ssh/authorized_keys && touch /home/deployer/.ssh/id_rsa && touch /home/deployer/.ssh/config

chmod 700 /home/deployer/.ssh && chmod 600 /home/deployer/.ssh/id_rsa && chown deployer:deployer -Rf /home/deployer/.ssh
- 为了deployer能正确访问git仓库(端口映射),需编辑 /home/deployer/.ssh/config,添加其使用用户(git)信息
Tips: 配置文件里面的git用户是gitlab容器内含了的, 端口映射到2222
Host host001.dev.ia
    User git
    Hostname host001.dev.ia
    Port 2222
    Preferredauthentications publickey
    IdentityFile ~/.ssh/id_rsa
    TCPKeepAlive yes
    AddKeysToAgent yes
完成后用deployer登录目标机器,测试是否能连接gitlab, 克隆仓库
ssh -T git@host001.dev.ia

git clone git@host001.dev.ia:dev1/team1-prj2.git
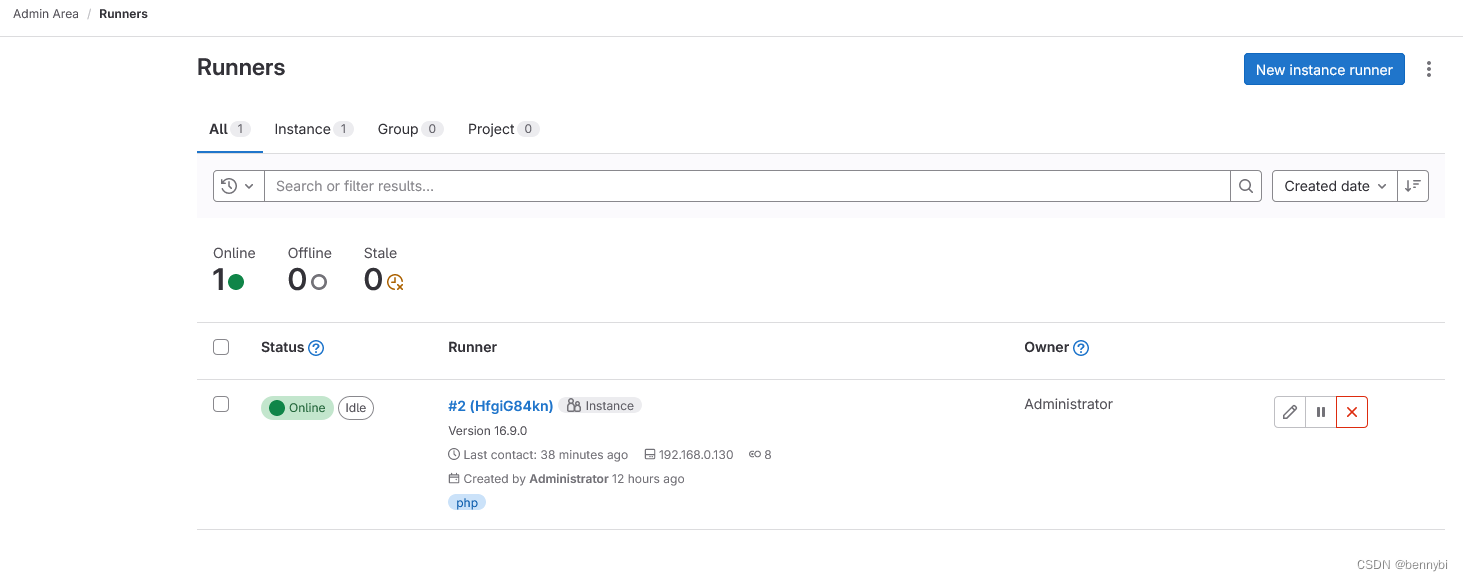
4.2.2 Gitlab Runner的设置
Runner 所处位置图: 通过Runner工作组,根据脚本进行构建与分发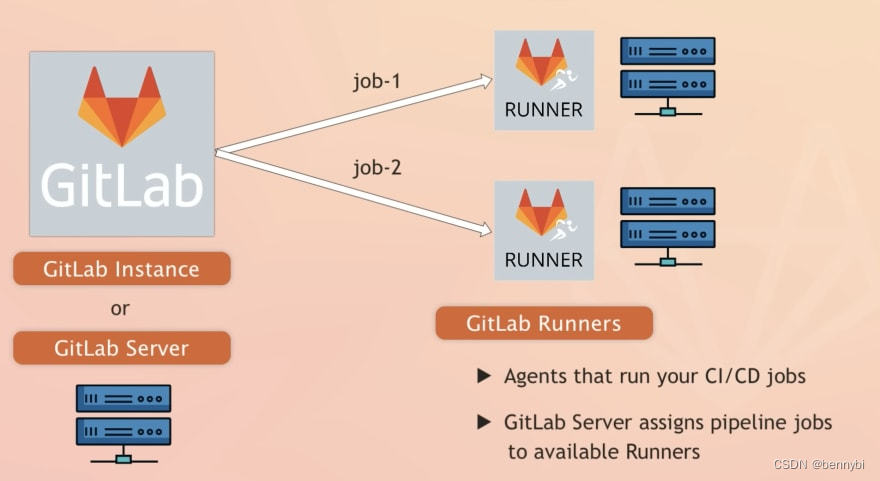
用root账号登陆,在管理面板(Admin Area)=> CI/CD => Runners页上建Runner,它实际上是个运行代理器,让工作机的关联进来,通过定义tag来调配对应的运行器完成任务,这里我定义了一个php的runner
gitlab在项目管理中提供了Pipeline editor工具,可以在不同分支定义一个.gitlab-ci.yml文件,记叙CI/CD步骤与详细内容,当用户提交并推送代码时触发过程
在构建服务器添加gitlab-runner用户,安装gitlab-runner客户端, 脚本 gitlab-runner-install.sh
#!/bin/bash

# Download the binary for your system
sudo curl -L --output /usr/local/bin/gitlab-runner https://gitlab-runner-downloads.s3.amazonaws.com/latest/binaries/gitlab-runner-linux-amd64

# Give it permission to execute
sudo chmod +x /usr/local/bin/gitlab-runner

# Create a GitLab Runner user
sudo useradd --comment 'GitLab Runner' --create-home gitlab-runner --shell /bin/bash

# Install and run as a service
sudo gitlab-runner install --user=gitlab-runner --working-directory=/home/gitlab-runner
sudo gitlab-runner start
注册runner
sudo gitlab-runner register  --url http://host001.dev.ia:18181  --token glrt-HfgiG84kn28NvU69stkh

- 选择shell类型

sudo gitlab-runner run

# 其他相关命令
gitlab-runner list
gitlab-runner unregister --all-runners
gitlab-runner unregister  --url http://host001.dev.ia:18181  --token glrt-ABh3NZLwxomjSk6szHbz
4.2.3 要点
- 在gitlab文档中,是没有提及给gitlab-runner账号配deployer私钥的,当用giltlab-runner账号在终端进行手动测试时,需把deployer的id_rsa拷贝过去 gitlab-runner/.ssh目录下。
- 为了访问hub.docker.com,需su gitlab-runner后,进行登录操作:docker login
- 改下gitlab-runner的.bash_logout,不然在工作机连接时 gitlab-runner会出现状况
cd /home/gitlab-runner#
mv .bash_logout .bash_logout.bak
- 当docker login出现"503 Service Unavailable"情况时,先查下当前的docker有没用代理,注意NO_PROXY
# Docker代理配置 /lib/systemd/system/docker.service.d/http-proxy.conf

[Service]
Environment="HTTP_PROXY=http://proxy-server0:1081"
Environment="HTTPS_PROXY=http://proxy-server0:1081"
Environment="NO_PROXY=*.dev.ia,*.k8s.ia,*.aliyun.com,*.aliyuncs.com,*.huaweicloud.com,localhost,127.0.0.1,0.0.0.0,10.0.0.0/8,172.17.0.0/12,192.168.0.0/16"
windows desktop : 剔除掉本地环境域名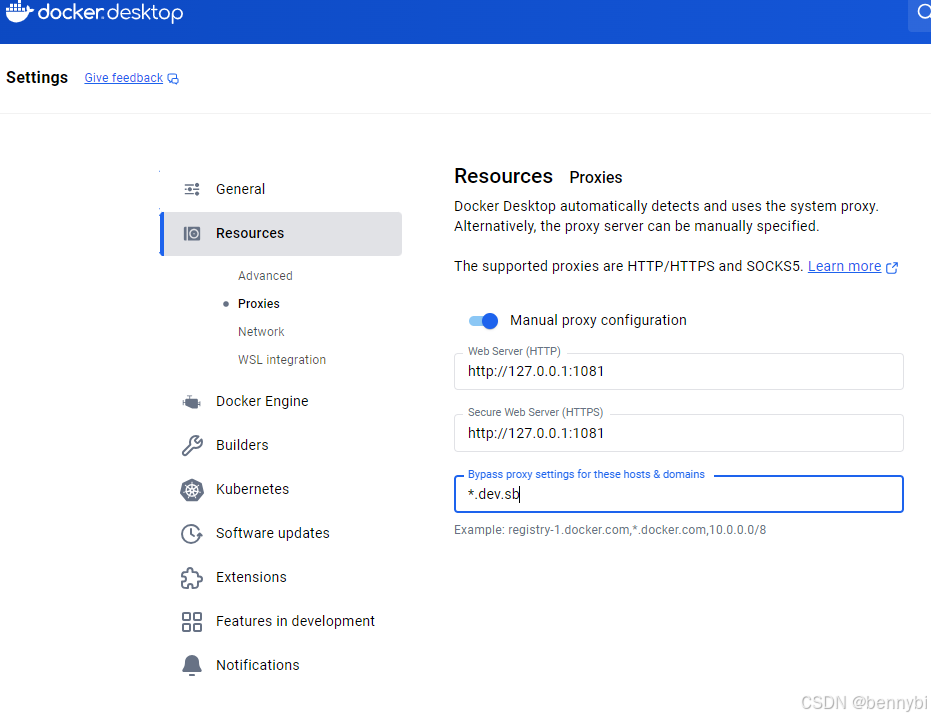
- 有时候指令中需要用到sudo, 所以把gitlab-runner加到sudo组里面
- 构建有时候因为获取镜像超时,这时可先变身为gitlab-runner后进行pull,使得镜像缓存到本地
代理设置:除了docker本身配置,为了构建时镜像内部更新顺利(apt install sth),配置/etc/profile里面的代理
export http_proxy=http://proxy-server0:1081
export https_proxy=http://proxy-server0:1081
export no_proxy=*.dev.ia,host001.dev.ia,*.k8s.ia,*.aliyun.com,*.aliyuncs.com,*.huaweicloud.com,localhost,127.0.0.1,0.0.0.0,10.0.0.0/8,172.17.0.0/12,192.168.0.0/16
Push镜像到hub.docker.com指定仓库前,需记得docker login,如:docker login http://somewhere
如果用nginx反代,出现错误: "error: RPC failed; HTTP 413 curl 22 The requested URL returned error: 413",配置nginx,server块:
client_max_body_size 0;
5. 容器镜像(Container Registry)
Gitlab还提供了一项容器镜像管理的功能,允许用户把项目构建成的镜像文件push到它的数据库中,统一管理,摸索良久分享之:
5.1 准备
- 因为本地部署测试,并不需要证书等烦人的东西,所以需把registry域名登记到/etc/docker/daemon.json非安全条项 (windows docker desktop下路径是: C:/Users/username/.docker/daemon.json),不然docker login会出现不能登录的问题
# cat /etc/docker/daemon.json
{"insecure-registries":["http://host001.dev.ia:18181","http://host001.dev.ia:5050"]}


# 添加docker启动项
# vi /etc/default/docker
DOCKER_OPTS="--config-file=/etc/docker/daemon.json"

# systemctl daemon-reload
# systemctl restart docker
5.2 配置
- 编辑 /data0/Server/Settings/gitlab/gitlab.rb,配置如下:
registry_external_url 'http://host001.dev.ia:5050'

### Settings used by GitLab application
gitlab_rails['registry_enabled'] = true
gitlab_rails['registry_host'] = "host001.dev.ia"
gitlab_rails['registry_port'] = "5050"
gitlab_rails['registry_path'] = "/var/opt/gitlab/gitlab-rails/shared/registry"
registry_nginx['listen_https'] = false
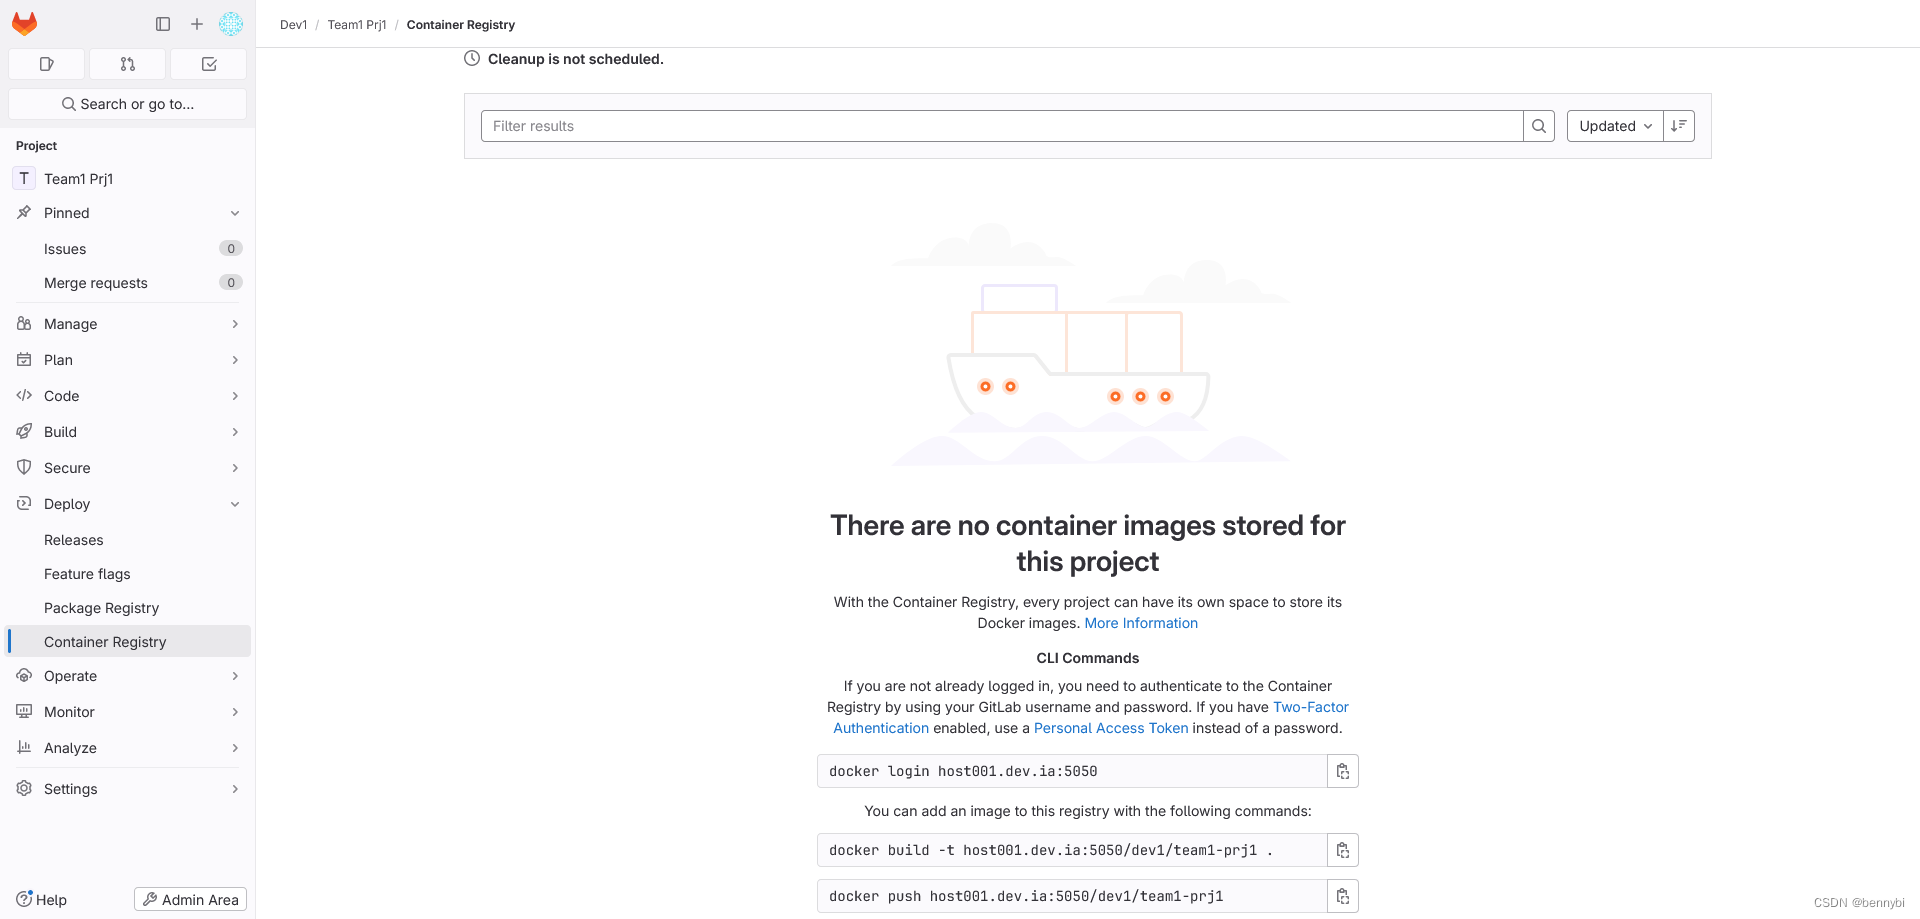
同时修改compose.yml, 开放5050为registry的访问端口,然后重新建立容器,项目的Deploy-Container Registry面板如图:
5.3 测试
# 测试连接
nc -zv host001.dev.ia 5050
curl -v http://host001.dev.ia:5050/v2/_catalog

# 测试登录
docker login http://host001.dev.ia:5050 -u ben -p wawawa
WARNING! Using --password via the CLI is insecure. Use --password-stdin.
Login Succeeded

# 构建镜像
docker build -t host001.dev.ia:5050/dev1/team1-prj1 .
...

# push上去
docker push host001.dev.ia:5050/dev1/team1-prj1
...
然后再访问 Container Registry, 如图:
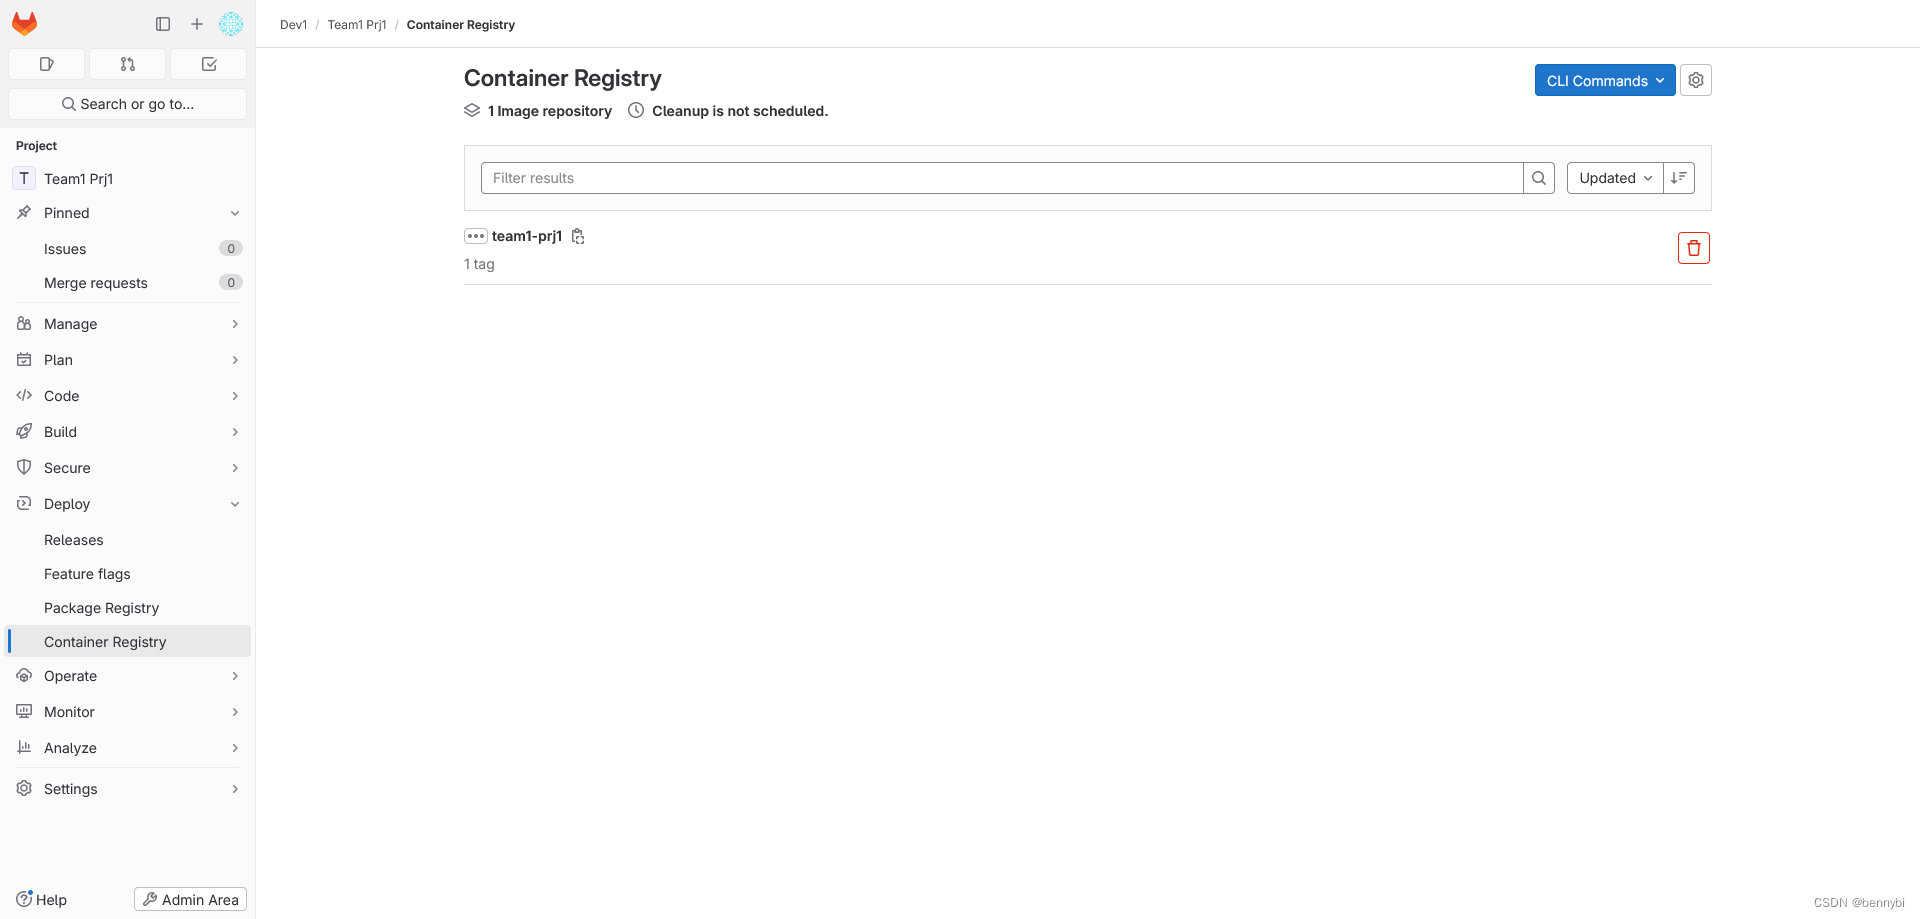
至此基本可用了。
6. 应用项目 CI/CD
7. Version 17.6 安装
安全端口放行 5005 (镜像仓库入口), 5000
docker-compose.yml
services:
  web:
    image: 'gitlab/gitlab-ce:latest'
    container_name: gitlab
    restart: always
    ports:
      - '18181:80'
      - '2222:22'
      - '5005:5005'
      - '5000:5000'
    environment:
      GITLAB_OMNIBUS_CONFIG: |
        external_url 'https://gitlab.xxx.top'
        gitlab_rails['smtp_enable'] = true
        gitlab_rails['smtp_address'] = 'smtpdm.xxx.com'
        gitlab_rails['smtp_port'] = 80
        gitlab_rails['smtp_user_name'] = ''
        gitlab_rails['smtp_password'] = ''
        gitlab_rails['smtp_authentication'] = 'login'
        gitlab_rails['smtp_enable_starttls_auto'] = true
        gitlab_rails['gitlab_email_from'] = 'gitlab@xx.top'
        nginx['redirect_http_to_https'] = false
        nginx['listen_port'] = 80
        nginx['listen_https'] = false
        gitlab_rails['registry_enabled'] = true
        gitlab_rails['registry_host'] = "gitlab.xxx.top"
        gitlab_rails['registry_port'] = 5005
        gitlab_rails['registry_path'] = "/var/opt/gitlab/gitlab-rails/shared/registry"
        registry_nginx['listen_https'] = false
    volumes:
      - '/data0/Server/Settings/gitlab:/etc/gitlab'
      - '/data0/Server/Logs/gitlab:/var/log/gitlab'
      - '/data0/Server/Db/gitlab:/var/opt/gitlab'
    shm_size: '512m'
gitlab.rb
# 配置以下选项
registry_external_url 'https://gitlab.xxx.top:5005'

gitlab_rails['registry_enabled'] = true
gitlab_rails['registry_host'] = "gitlab.xxx.top"
gitlab_rails['registry_port'] = "5005"
gitlab_rails['registry_path'] = "/var/opt/gitlab/gitlab-rails/shared/registry"
registry['enable'] = true

gitlab_rails['registry_api_url'] = "http://127.0.0.1:5000"
gitlab_rails['registry_key_path'] = "/var/opt/gitlab/gitlab-rails/certificate.key"
gitlab_rails['registry_issuer'] = "omnibus-gitlab-issuer"
8. 参考
- https://medium.com/@BuildWithLal/gitlab-setup-using-docker-compose-a-beginners-guide-3dbf1ef0cbb2
- Use SSH keys to communicate with GitLab | GitLab| GitLab" style="box-sizing: border-box; outline: none; margin: 0px; padding: 0px; text-decoration-line: none; cursor: pointer; color: rgb(78, 161, 219); font-synthesis-style: auto; overflow-wrap: break-word;">Use SSH keys to communicate with GitLab | GitLab| GitLab" style="box-sizing: border-box; outline: none; margin: 0px; padding: 0px; text-decoration-line: none; cursor: pointer; color: rgb(78, 161, 219); font-synthesis-style: auto; overflow-wrap: break-word;">Use SSH keys to communicate with GitLab | GitLab| GitLab" style="box-sizing: border-box; outline: none; margin: 0px; padding: 0px; text-decoration-line: none; cursor: pointer; color: rgb(78, 161, 219); font-synthesis-style: auto; overflow-wrap: break-word;">Use SSH keys to communicate with GitLab | GitLab| GitLab" style="box-sizing: border-box; outline: none; margin: 0px; padding: 0px; text-decoration-line: none; cursor: pointer; color: rgb(78, 161, 219); font-synthesis-style: auto; overflow-wrap: break-word;">Use SSH keys to communicate with GitLab | GitLab
- .gitlab-ci.yml 配置 · PHP/Python/前端/Linux 等等 学习笔记 · 看云
- gitlab runner tag - 简书
- GitLab CI/CD for Beginners [FREE Course] - DEV Community
推荐本站淘宝优惠价购买喜欢的宝贝:

本文链接:https://www.hqyman.cn/post/11805.html 非本站原创文章欢迎转载,原创文章需保留本站地址!
打赏

微信支付宝扫一扫,打赏作者吧~
休息一下~~
