
推荐点击下面图片,通过本站淘宝优惠价购买:

1. 介绍
Wix Toolset是一个打包工具,用于将开发好的软件或者三方库打包成Windows安装程序(Microsoft Installer,MSI)。这个工具本身是开源的,通过XML文件来配置打包属性。使用方法是:
1. 首先需要编写打包配置文件**.wxs,不妨命名为Sample.wxs,这个文件本身就是XML格式。
2. 然后Wix Toolset的candle.exe工具来“编译”Sample.wxs。即执行candle.exe Sample.wxs命令,该命令执行后会在同目录下生成Sample.wixobj文件。
3. 使用Wix Toolset的light.exe工具来“链接”Sample.wixobj。即执行light.exe Sample.wixobj命令,该命令执行后会在同目录下生成Sample.msi,即我们安装包文件。
4. 如果我们Sample.msi本身会依赖于一些框架,比如.Net Framework 4。而用户可能没有安装.Net Framework 4,这时候可以再编写一个ExeBundle.wxs(名字任意取),里面需要有<Bundle></Bundle>标签。然后“编译”和“链接”就可以得到一个新的安装包ExeBundle.exe,当安装Sample.msi时如果没有.Net Framework 4环境,自动安装这个环境,有则不用安装,后面我们会详细说明。
2. 一个简单的例子
先看一个官方给出的简单的例子(参考: https://www.firegiant.com/wix/tutorial/getting-started/ ),如果想直接看打包文件夹为MSI的可以跳过这一节。
2.1 编写SampleFirst.wxs
假设我们要打包如下3个文件为一个安装包。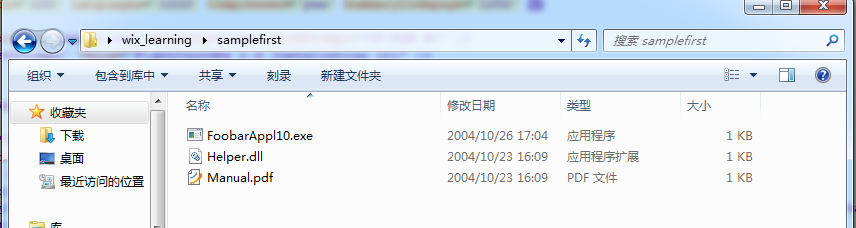
首先我们需要编写打包配置文件SampleFirst.wxs,内容如下,SampleFirst.wxs与3个文件的同一目录。
<?xml version='1.0' encoding='windows-1252'?><Wix xmlns='http://schemas.microsoft.com/wix/2006/wi'>
  <!--Id和UpgradeCode设置为GUID就可以,使用网站https://www.iamwawa.cn/guid.html就可以生成-->
  <Product Name='Foobar 1.0' Id='096bf663-e5e4-4987-ad59-e5766d113ec3' UpgradeCode='096bf663-e5e4-4987-ad59-e5766d113ec3'
    Language='1033' Codepage='1252' Version='1.0.0' Manufacturer='Acme Ltd.'>

    <!--设置MSI安装包信息-->
    <Package Id='*' Keywords='Installer'
	  Description="Acme's Foobar 1.0 Installer"
      Comments='Foobar is a registered trademark of Acme Ltd.' Manufacturer='Acme Ltd.'
      InstallerVersion='100' Languages='1033' Compressed='yes' SummaryCodepage='1252' />

    <!--将资源放入MSI中,也可以将资源与MSI安装包分割-->
    <Media Id='1' Cabinet='Sample.cab' EmbedCab='yes' DiskPrompt="CD-ROM #1" />
    <Property Id='DiskPrompt' Value="Acme's Foobar 1.0 Installation [1]" />

    <!--改变INSTALLDIR初始值-->
    <!--<Property Id="INSTALLDIR" Value="E:\\"/>-->

    <Directory Id='TARGETDIR' Name='SourceDir'>
      <Directory Id='ProgramFilesFolder' Name='PFiles'>
        <Directory Id='Acme' Name='Acme'>
          <Directory Id='INSTALLDIR' Name='Foobar 1.0'>
            <!-- 安装的文件都放在这里面 -->
            <!-- 文件FoobarAppl10.exe,还有Shortcut -->
            <Component Id='MainExecutable' Guid='636d41d9-d950-4a82-90f7-e186d5ebcf24'>
              <File Id='FoobarEXE' Name='FoobarAppl10.exe' DiskId='1' Source='FoobarAppl10.exe' KeyPath='yes'>
                <Shortcut Id="startmenuFoobar10" Directory="ProgramMenuDir" Name="Foobar 1.0" WorkingDirectory='INSTALLDIR' Icon="Foobar10.exe" IconIndex="0" Advertise="yes" />
                <Shortcut Id="desktopFoobar10" Directory="DesktopFolder" Name="Foobar 1.0" WorkingDirectory='INSTALLDIR' Icon="Foobar10.exe" IconIndex="0" Advertise="yes" />
              </File>
            </Component>

            <!-- 文件Helper.dll -->
            <Component Id='HelperLibrary' Guid='4e6393c0-e202-48ef-b87f-c89dab205350'>
              <File Id='HelperDLL' Name='Helper.dll' DiskId='1' Source='Helper.dll' KeyPath='yes' />
            </Component>

            <!-- Manual.pdf -->
            <Component Id='Manual' Guid='6b2bb045-d2ee-43e0-b6ca-f60f9a8f0c49'>
              <File Id='Manual' Name='Manual.pdf' DiskId='1' Source='Manual.pdf' KeyPath='yes'>
                <Shortcut Id="startmenuManual" Directory="ProgramMenuDir" Name="Instruction Manual" Advertise="yes" />
              </File>
            </Component>

          </Directory>
        </Directory>
      </Directory>


      <Directory Id="ProgramMenuFolder" Name="Programs">
        <Directory Id="ProgramMenuDir" Name="Foobar 1.0">
          <Component Id="ProgramMenuDir" Guid="47a74487-0455-4084-926c-1ffe09958a01">
            <RemoveFolder Id='ProgramMenuDir' On='uninstall' />
            <RegistryValue Root='HKCU' Key='Software\[Manufacturer]\[ProductName]' Type='string' Value='' KeyPath='yes' />
          </Component>
        </Directory>
      </Directory>

      <Directory Id="DesktopFolder" Name="Desktop" />
    </Directory>

    <!-- 这里可以设置安装方式,如 完整,典型,自定义 安装 -->
    <Feature Id='Complete' Title='Foobar 1.0' Description='The complete package.'
      Display='expand' Level='1' ConfigurableDirectory='INSTALLDIR'>
      <Feature Id='MainProgram' Title='Program' Description='The main executable.' Level='1'>
        <ComponentRef Id='MainExecutable' />
        <ComponentRef Id='HelperLibrary' />
        <ComponentRef Id='ProgramMenuDir' />
      </Feature>

      <Feature Id='Documentation' Title='Description' Description='The instruction manual.' Level='1000'>
        <ComponentRef Id='Manual' />
      </Feature>
    </Feature>

    <!-- 很重要如果UI是WixUI_InstallDir那么这一句必须有 -->
    <Property Id="WIXUI_INSTALLDIR" Value="INSTALLDIR" />
    <!-- 不同的UI参考 https://www.firegiant.com/wix/tutorial/user-interface/ui-wizardry/ -->
    <UIRef Id="WixUI_InstallDir" />
    <UIRef Id="WixUI_ErrorProgressText" />

    <Icon Id="Foobar10.exe" SourceFile="FoobarAppl10.exe" />

    <!-- 安装完成后可以自定义一些动作,比如打开软件等 -->
    <!-- 参考https://www.firegiant.com/wix/tutorial/events-and-actions/extra-actions/ -->

  </Product></Wix>折叠
然后打开cmd,“编译”和“链接”SampleFirst.wxs,命令分别是candle SampleFirst.wxs和light SampleFirst.wixobj -ext WixUIExtension。由于使用了<UIRef />,所以需要-ext WixUIExtension。命令执行完后会生成如下文件,这样就完成了打包。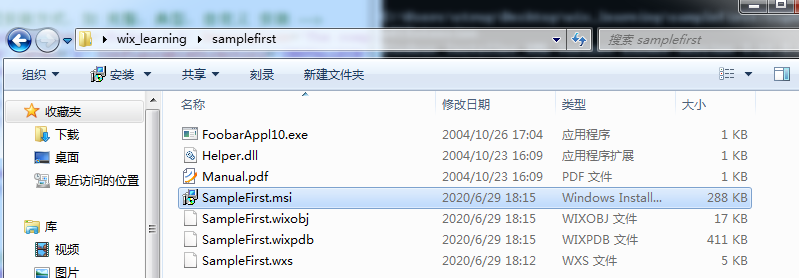
3. 打包文件夹为MSI
比如我需要打包一个文件夹,如下图。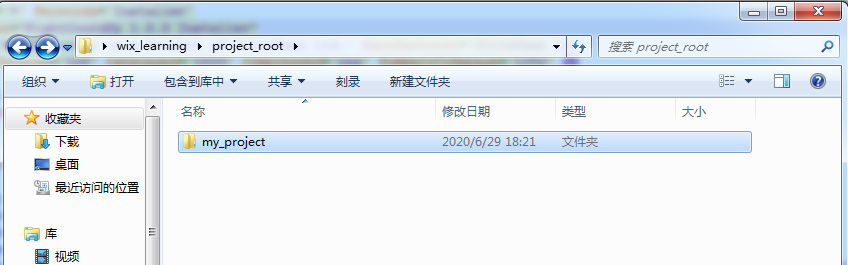
3.1 使用heat.exe生成temp.wxs
由于该文件夹中有很多文件,所以我们需要用heat.exe命令(参考 https://wixtoolset.org/documentation/manual/v3/overview/heat.html )来帮我们将这些文件生成对应的<Component/>。使用命令:heat.exe dir my_project -cg MyComponentGroup -gg -sfrag -template fragment -out temp.wxs。
结果如下,可以看到执行命令后报错了,但是其实不影响。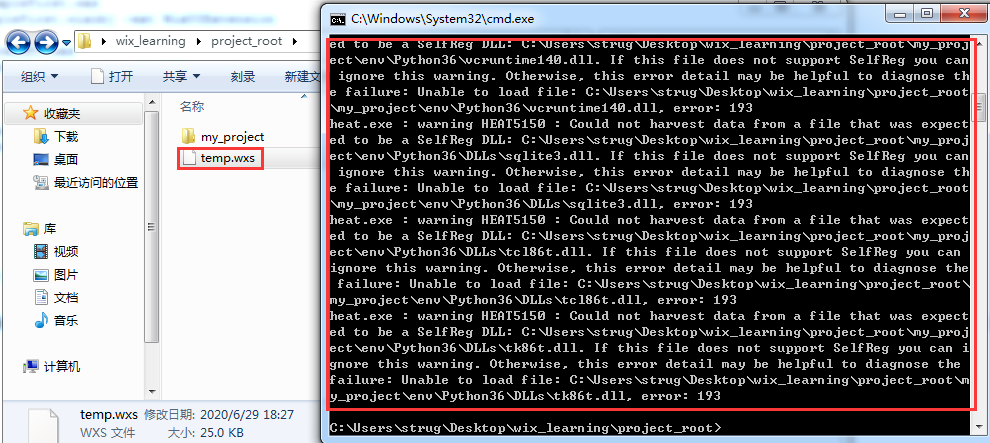
打开temp.wxs,然后将<Component/>中文件的路径改为有效路径。就是将: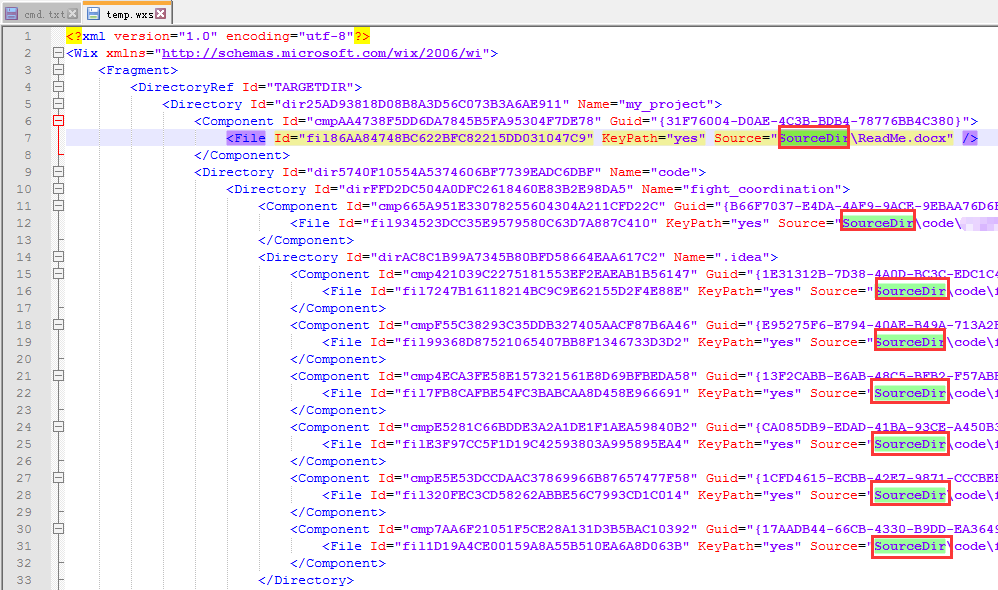
替换为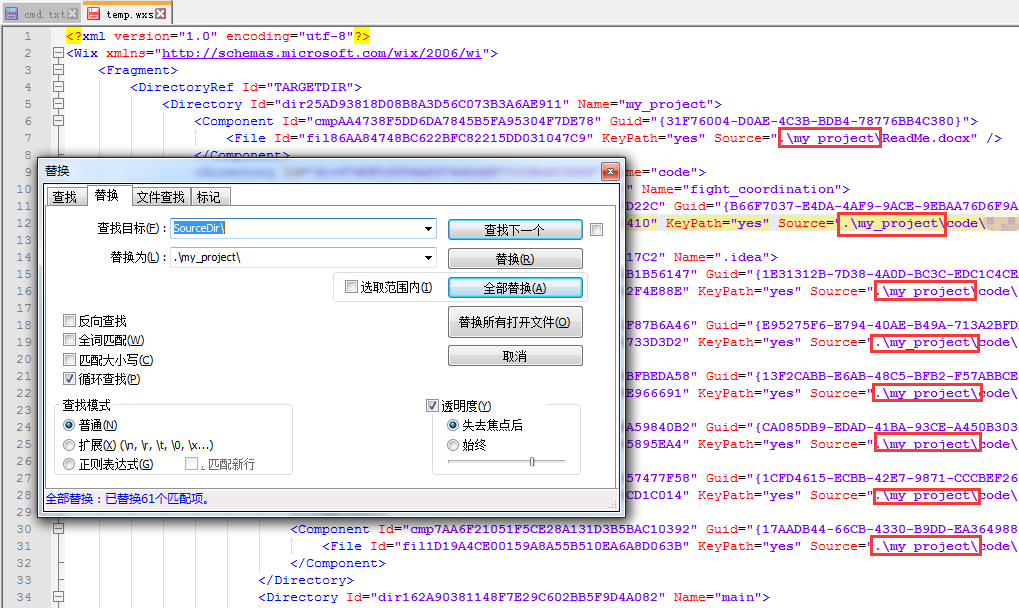
3.2 编写Pack2MSI.wxs
然后编写Pack2MSI.wxs,这里就需要将temp.wxs中的Component复制过去,内容如下:
<?xml version='1.0' encoding='windows-1252'?><Wix xmlns="http://schemas.microsoft.com/wix/2006/wi">
  <!--Id和UpgradeCode设置为GUID就可以,使用网站https://www.iamwawa.cn/guid.html就可以生成-->
  <Product Name='MyProject' Id='176eb4a6-0272-4867-a445-d193e9ce0b77' UpgradeCode='7390005a-18ab-437d-bdaa-ef4c281ccf37'
    Language='1033' Codepage='1252' Version='1.0.0' Manufacturer='Companion Ltd.'>

    <!--设置MSI安装包信息-->
    <Package Id='*' Keywords='Installer'
	  Description="MyProject 1.0.0 Installer"
      Comments='MyProject is a Project of Company Ltd.' Manufacturer='Company Ltd.'
      InstallerVersion='100' Languages='1033' Compressed='yes' SummaryCodepage='1252' />

    <!--将资源放入MSI中,也可以将资源与MSI安装包分割-->
    <Media Id='1' Cabinet='Sample.cab' EmbedCab='yes' DiskPrompt="CD-ROM #1" />
    <Property Id='DiskPrompt' Value="MyProject 1.0 Installation [1]" />

    <!--改变INSTALLDIR初始值-->
    <!--<Property Id="INSTALLDIR" Value="E:\\"/>-->


    <Directory Id='TARGETDIR' Name='SourceDir'>

      <!-- 安装的文件被写在了下面的INSTALLDIR -->
      <Directory Id="ProgramMenuFolder" Name="Programs">
        <Directory Id="ProgramMenuDir" Name="MyProject 1.0">
          <Component Id="ProgramMenuDir" Guid="a910e463-5576-43c8-9260-dec72d82462e">
            <RemoveFolder Id='ProgramMenuDir' On='uninstall' />
            <RegistryValue Root='HKCU' Key='Software\[Manufacturer]\[ProductName]' Type='string' Value='MyProject by Company Ltd.' KeyPath='yes' />
          </Component>
        </Directory>
      </Directory>

      <Directory Id="DesktopFolder" Name="Desktop" />
    </Directory>

    <!-- 这里可以设置安装方式,如 完整,典型,自定义 安装 -->
    <Feature Id='Complete' Title='FightCoordPy 1.0' Description='The complete package.'
      Display='expand' Level='1' ConfigurableDirectory='INSTALLDIR'>
      <Feature Id='MainProgram' Title='Program' Description='The Environment and Source Code.' Level='1'>
        <!-- 注意这里引用ComponentGroup -->
        <ComponentGroupRef  Id='MyComponentGroup' />
        <ComponentRef Id='ProgramMenuDir' />
      </Feature>
    </Feature>

    <!-- 很重要如果UI是WixUI_InstallDir那么这一句必须有 -->
    <Property Id="WIXUI_INSTALLDIR" Value="INSTALLDIR" />
    <!-- 不同的UI参考 https://www.firegiant.com/wix/tutorial/user-interface/ui-wizardry/ -->
    <UIRef Id="WixUI_InstallDir" />
    <UIRef Id="WixUI_ErrorProgressText" />

    <!-- 这里也可以自定义安装过程中显示的内容,License文件、banner图片、Dialog图片-->

    <!--<WixVariable Id="WixUILicenseRtf" Value="RelativePath\License.rtf" />
    <WixVariable Id="WixUIBannerBmp" Value="RelativePathh\banner.bmp" />
    <WixVariable Id="WixUIDialogBmp" Value="RelativePath\dialog.bmp" />-->

    <!--<Icon Id="app.exe" SourceFile="" />-->

    <!-- 安装完成后可以自定义一些动作,比如打开软件等 -->
    <!-- 参考https://www.firegiant.com/wix/tutorial/events-and-actions/extra-actions/ -->
  </Product>


  <Fragment>
        <DirectoryRef Id="TARGETDIR">
            <Directory Id='ProgramFilesFolder' Name='PFiles'>
                <!--公司ID文件夹-->
                <Directory Id='CompanyID' Name='CompanyID'>
                    <!--项目ID文件夹-->
                    <Directory Id='INSTALLDIR' Name='MyProject 1.0'>
                        <!-- 安装的文件都放在这里面 -->
                        <!-- 复制刚刚temp.wxs中第1个Fragment中的内容到这里 -->
                        <Directory Id="dir25AD93818D08B8A3D56C073B3A6AE911" Name="my_project">
                            <Component Id="cmpAA4738F5DD6DA7845B5FA95304F7DE78" Guid="{31F76004-D0AE-4C3B-BDB4-78776BB4C380}">
                                <File Id="fil86AA84748BC622BFC82215DD031047C9" KeyPath="yes" Source=".\my_project\ReadMe.docx" />
                            </Component>
                            <!-- 后面省略...... -->
                        </Directory>
                    </Directory>
                </Directory>
            </Directory>
        </DirectoryRef>
    </Fragment>
    <!-- 复制刚刚temp.wxs中第2个Fragment中的内容到这里 -->
    <Fragment>
        <ComponentGroup Id="MyComponentGroup">
            <ComponentRef Id="cmp6EC6E23C0D7DF340A98705574102B046" />
            <ComponentRef Id="cmp88CDEC8D4664405F22A3335BE6DFFD6E" />
            <ComponentRef Id="cmpCC9AE923AC764B56073C311FAB2E97CB" />
            <!-- 后面省略...... -->
        </ComponentGroup>
    </Fragment></Wix>折叠
3.3 生成MSI
运行命令candle Pack2MSI.wxs和light Pack2MSI.wixobj -ext WixUIExtension就打包成功了,如下图: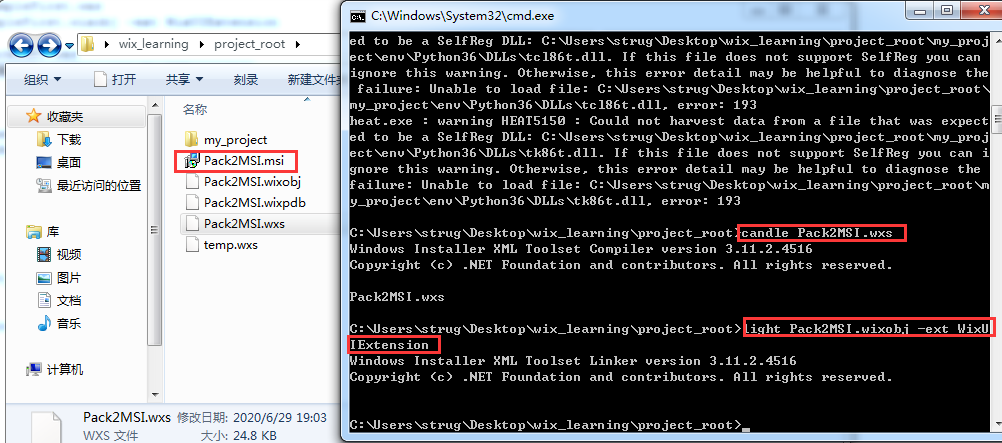
然后可以安装测试一下。
3.4 添加依赖程序
比如安装Pack2MSI.msi需要依赖VC++ 2015 x64运行库,即vc_redist.x64.exe。这时可以使用<Bundle/>,首先看一下文件夹结构,如下图所示。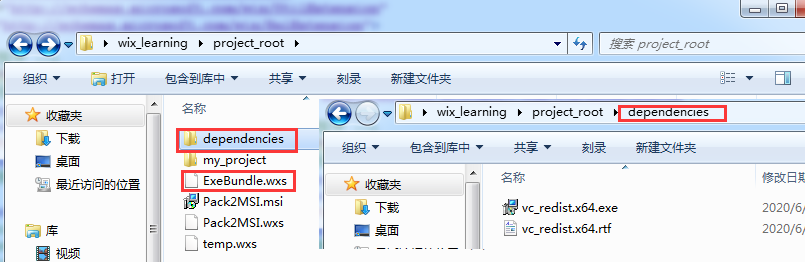
3.4.1 编写ExeBundle.wxs
内容如下:
<?xml version='1.0' encoding='windows-1252'?><Wix xmlns="http://schemas.microsoft.com/wix/2006/wi"
	 xmlns:util="http://schemas.microsoft.com/wix/UtilExtension"
	 xmlns:bal="http://schemas.microsoft.com/wix/BalExtension">

  <!-- 配置安装程序 -->
  <Bundle Name="Test 2020 Setup" Version='1.0.0' UpgradeCode='033bc647-80f5-4010-80d6-ac0fc32368dc'>
      <!-- 设置安装程序的许可证 -->
      <BootstrapperApplicationRef Id="WixStandardBootstrapperApplication.RtfLicense">
		<bal:WixStandardBootstrapperApplication
        LicenseFile=".\dependencies\vc_redist.x64.rtf"/>
	  </BootstrapperApplicationRef>
      <!-- 多个安装包串行安装 -->
      <Chain>
        <PackageGroupRef Id="DependencyPackage" />
        <!--DownloadURL="https://download.microsoft.com/download/9/3/F/93FCF1E7-E6A4-478B-96E7-D4B285925B00/vc_redist.x64.exe"-->
        <!--<ExePackage
            SourceFile=".\packages\shared\vc_redist.x64.exe"
            InstallCommand="/q /ACTION=Install"
            RepairCommand="/q ACTION=Repair /hideconsole"
            UninstallCommand="/q ACTION=Uninstall /hideconsole"
            InstallCondition="VersionNT64 AND VersionNT >= v5.1" />
        -->

        <!-- 这是我们的安装包,DisplayInternalUI表示是否显示Pack2MSI.msi原始的安装UI,Visible表示安装后是否显示在控制面板上 -->
        <MsiPackage
          SourceFile=".\Pack2MSI.msi"
		  Id="SampleFirstMSI"
		  DisplayInternalUI="yes"
		  Visible="yes"
		  Permanent="no"
          InstallCondition="VersionNT64 AND VersionNT >= v5.1" />
      </Chain>
  </Bundle>

  <Fragment>
    <!-- 先判断VC++ 2015 x64 是否安装了 -->
	<util:RegistrySearch
        Variable="vcRedist2015Exist"
        Root="HKLM"
        Key="SOFTWARE\Classes\Installer\Dependencies\{323dad84-0974-4d90-a1c1-e006c7fdbb7d}"
        Result="exists"/>
    <PackageGroup Id="DependencyPackage">
        <!--DownloadURL="https://download.microsoft.com/download/9/3/F/93FCF1E7-E6A4-478B-96E7-D4B285925B00/vc_redist.x64.exe"-->
        <!-- 注意这里的InstallCondition,表示vc_redist.x64.exe只能是64位,Windows XP 并且没有安装vc_redist.x64.exe时候才安装 -->
        <ExePackage
          SourceFile=".\dependencies\vc_redist.x64.exe"
          InstallCommand="/q /ACTION=Install"
          RepairCommand="/q ACTION=Repair /hideconsole"
          UninstallCommand="/q ACTION=Uninstall /hideconsole"
          InstallCondition="VersionNT64 AND VersionNT >= v5.1 AND vcRedist2015Exist = 0" />
    </PackageGroup>
  </Fragment></Wix>折叠
3.4.2 生成ExeBundle.exe
分别执行命令:candle ExeBundle.wxs -ext WixBalExtension -ext WixUtilExtensionlight ExeBundle.wixobj -ext WixBalExtension -ext WixUtilExtension
就可以得到安装包ExeBundle.exe。 运行ExeBundle.exe可以得到如图所示的页面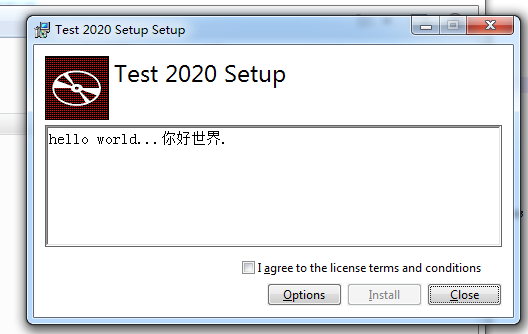
如有问题,欢迎斧正和讨论。
参考
1. https://www.firegiant.com/wix/tutorial/getting-started/
2. https://blog.csdn.net/zerg_nick/article/details/102636516
本文链接:http://www.hqyman.cn/post/2470.html 非本站原创文章欢迎转载,原创文章需保留本站地址!
休息一下,本站随机推荐观看栏目: